


Table of contents
I made this cheat sheet so future me wouldn't have to go looking all over the web for the most commonly used methods to manipulate the DOM. Hope this is helpful for you too!
PermalinkSelect element from HTML into JS
I use the document object a lot in the following examples as it represents the web page. However, keep in mind we can use any variable here and it'll work the same.
PermalinkgetElementBy
In order to manipulate elements from the DOM we need to select it, usually this can be done by selecting the class or ID. This method does exactly as the name suggests:
document.getElementById('id-name')document.getElementsByClassName('class-name')
When there are multiple classes with the same name this method will return a HTMLCollection. If you want your collection to be able to access array method use Array.from(document.getElementsByClassName('class-name')) to convert it to an array.
PermalinkquerySelector
These methods below can retrieve elements from the DOM using any CSS selector making it more versatile. For syntax make sure the CSS selector includes the # for ID and . for classes.
document.querySelector('CSS selector')document.querySelectorAll('CSS selector')
When we use querySelector and there are multiple elements with the same CSS selector it will only select the first one in the DOM. querySelectorAll will return a NodeList of all elements. A NodeList can be converted to an array but not the other way around.
PermalinkParent, children and siblings
.parentElementis used to select children of element, we can access specific children using the same syntax as arrays.childrenis used to select parent of element.nextElementSiblingused to select the next sibling and.previousElementSiblingdoes the opposite
HTML
<div class="parent">
  <div class="child">First Child</div>
  <div class="child">Second Child</div>
  <div class="child">Third Child</div>
</div>
JavaScript
const parent = document.querySelector('.parent');
const child = parent.children;  //returns HTMLCollection

const secondChild = child[1]; //selects second child
const parent = secondChild.parentElement; //selects parent of second child
const thirdChild = secondChild.nextElementSibling; //selects the next sibling
PermalinkAttributes
There are two methods to select the attribute of an element
element.getAttribute('attribute')element.attribute
HTML
<div id="bye"> Hello </div>
JavaScript
const div = document.querySelector('div');

const methodOne= div.getAttribute('id');
const methodTwo= div.id;

// Both print bye
console.log(methodOne);
console.log(methodTwo);
PermalinkAdding and Removing
PermalinkCreate Elements
This creates an HTML element, however even though it's been created it hasn't been added to the DOM yet so we won't see it show up on the page.
document.createElement(' ').classList. add(' ')we can use this to add a class
const newDiv = document.createElement('div');
newDiv.classList.add('bold');

//Results in DOM
<div class='bold'> </div>
PermalinkAdd Elements
.append(' ')adds the newly created element to the DOM
//select where we want to append to the new element to
const body = document.body;
body.append(newDiv);
PermalinkRemove Elements
.remove()removes elementsparent-element.remove(child-element);.removeAttribute('...')removes attributes.reset()resets form values to initial values
Example of removing element
const div = document.querySelector("div");
div.remove();
PermalinkModifying
PermalinkModifying attributes
element.setAttribute('attribute')method modifies attributes
PermalinkData Attributes
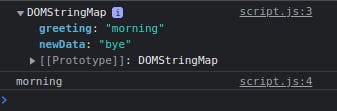
Data attributes are custom attributes we can assign to elements, they always start with data-. The example below shows how we can access them.
HTML
<div id="gm" data-greeting='morning'> Good morning </div>
JavaScript
const greeting = document.querySelector('#gm');

console.log(greeting.dataset); //DOMStringMap
console.log(greeting.dataset.greeting); // morning

//adds new data set attribute
const newDataAttribute = greeting.dataset.newData = 'bye';
Output
PermalinkModifying Style
If you want to set any CSS property use .style.propretyName making sure the property name is converted to camel case.

PermalinkModifying Class
There's a wide range of different methods with .classList, here are some of the most important ones:
.classList.add(' ... ')adds a new class to an element.classList.toggle(' ... ')adds the class if it doesn't exist or removes it if it does exist.classList.remove(' ... ')removes a class to an element
PermalinkModifying Text
There are a few options to manipulate text:
.textContent.innerText. innerHTML
So what's the difference?
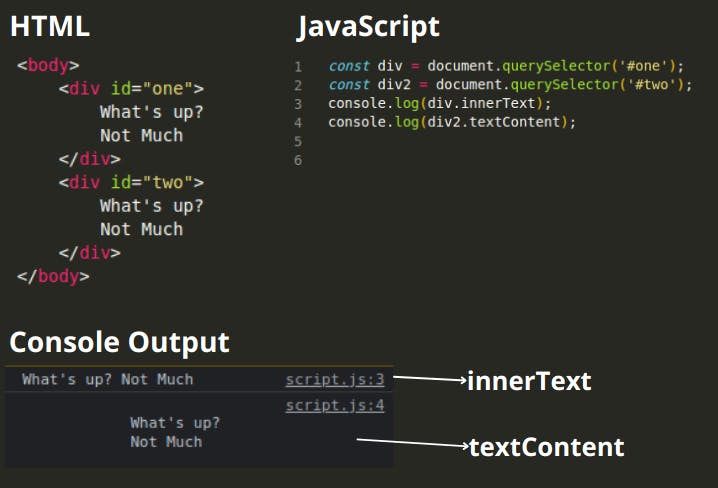
Both .textContent and .innerText can alter strings the same but the only difference is how we view the output. .innertext prints out all indentation and spacing from the HTML while .textContent prints out what will be displayed on the website.
.innerHTML renders HTML inside the HTML element, this means we can render html from JavaScript. This can be extremely convenient however, it comes with certain security issues as now users can manipulate the HTML via .innerHTML.

PermalinkFunctions
PermalinkaddEventsListener
element.addEventListener('event', function) method waits for an event to occur, usually done by the user, and then executes a function.
- there are tons of events type we can listen for e.g. 'click', 'mouseover', 'keydown' etc
- you can have multiple event listeners on one element
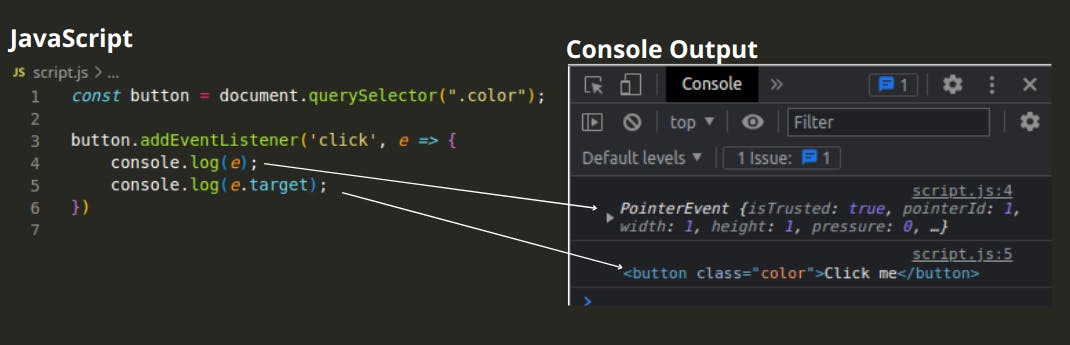
- callback functions takes in the parameter
eor event object, which contains information about the event that has just occurred. There are so many properties we can access using., go through the list to see what you can use next time you code.
There is a third parameter called options addEventListener(type, listener, options), this can be used to execute the function just once and then remove itself
button.addEventListener('click', changeColor(), {once: true} );
.removeEventListener can be used to remove the event listener, example below removes it after 2 seconds.
const element = document.querySelector('div);

element.addEventListener('click',  greeting);

setTimeout( function() {
  element.removeEventListener('click', greeting)
}, 2000);

function greeting() {
  console.log('hello world');
}
Permalinke object
Common properties
- e.target: what is being clicked
- e.currentTarget: what owns the eventListener
PermalinkforEach
array.forEach(function) method assigns a function for each element in an array or nodeList, this can be used to assign functions to a group of elements without repeating code.
Here is an example below, note child can be called anything and it is just used to identify the individual item in the array within the forEach parameter.
HTML
<div class="parent">
  <div class="child">First Child</div>
  <div class="child">Second Child</div>
  <div class="child">Third Child</div>
</div>
JavaScript
const children = document.querySelectorAll('.child'); //select all child divs

children.forEach( child => {
    child.addEventListener('click', changeColor);
})

function changeColor() {
  this.style.color = 'red';
}